Table of Contents
Let's start with setting up a very simple read only file server with Samba. Everyone (even anonymous guests) will receive read access.
The first step is to create a directory and put some test files in it.
[root@RHEL52 ~]# mkdir -p /srv/samba/readonly
[root@RHEL52 ~]# cd /srv/samba/readonly/
[root@RHEL52 readonly]# echo "It is cold today." > winter.txt
[root@RHEL52 readonly]# echo "It is hot today." > summer.txt
[root@RHEL52 readonly]# ls -l
total 8
-rw-r--r-- 1 root root 17 Jan 21 05:49 summer.txt
-rw-r--r-- 1 root root 18 Jan 21 05:49 winter.txt
[root@RHEL52 readonly]#
In this example the samba server is a member of WORKGROUP (the default workgroup). We also set a descriptive server string, this string is visible to users browsing the network with net view, windows explorer or smbclient.
[root@RHEL52 samba]# head -5 smb.conf
[global]
 workgroup = WORKGROUP
 server string = Public Anonymous File Server
 netbios name = TEACHER0
 security = share
You might have noticed the line with security = share. This line sets the default security mode for our samba server. Setting the security mode to share will allow clients (smbclient, any windows, another Samba server, ...) to provide a password for each share. This is one way of using the SMB/CIFS protocol. The other way (called user mode) will allow the client to provide a username/password combination, before the server knows which share the client wants to access.
The share is called pubread and the path is set to our newly created directory. Everyone is allowed access (guest ok = yes) and security is set to read only.
[pubread]
path = /srv/samba/readonly
comment = files to read
read only = yes
guest ok = yes
Here is a very similar configuration on Ubuntu 11.10.
root@ubu1110:~# cat /etc/samba/smb.conf
[global]
workgroup = LINUXTR
netbios name = UBU1110
security = share
[roshare1]
path = /srv/samba/readonly
read only = yes
guest ok = yes
It doesn't really matter which Linux distribution you use. Below the same config on Debian 6, as good as identical.
root@debian6:~# cat /etc/samba/smb.conf
[global]
workgroup = LINUXTR
netbios name = DEBIAN6
security = share
[roshare1]
path = /srv/samba/readonly
read only = yes
guest ok = yes
After testing with testparm, restart the samba server (so you don't have to wait).
[root@RHEL4b readonly]# service smb restart
Shutting down SMB services:                                [  OK  ]
Shutting down NMB services:                                [  OK  ]
Starting SMB services:                                     [  OK  ]
Starting NMB services:                                     [  OK  ]
You can now verify the existence of the share with smbclient. Our pubread is listed as the fourth share.
[root@RHEL52 samba]# smbclient -NL 127.0.0.1
Domain=[WORKGROUP] OS=[Unix] Server=[Samba 3.0.33-3.7.el5]

	Sharename       Type      Comment
	---------       ----      -------
	IPC$            IPC       IPC Service (Public Anonymous File Server)
	global$         Disk
	pub0            Disk
	pubread         Disk      files to read
Domain=[WORKGROUP] OS=[Unix] Server=[Samba 3.0.33-3.7.el5]

	Server               Comment
	---------            -------
	TEACHER0             Samba 3.0.33-3.7.el5
	W2003EE

	Workgroup            Master
	---------            -------
	WORKGROUP            W2003EE
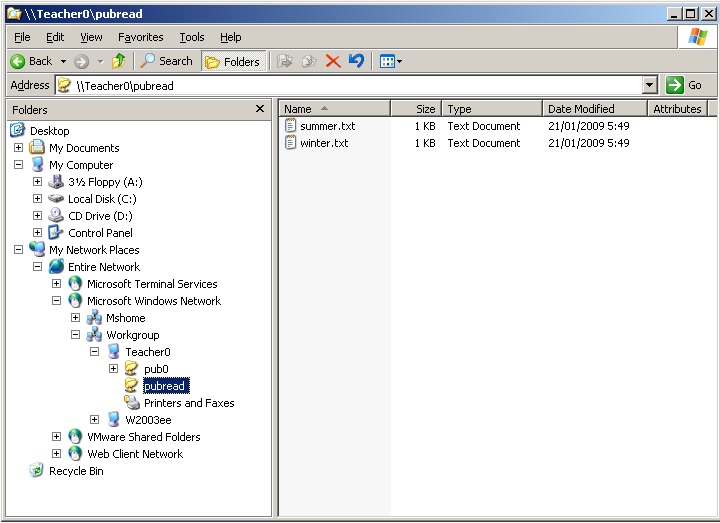
The final test is to go to a Microsoft windows computer and read a file on the Samba server. First we use the net use command to mount the pubread share on the driveletter k.
C:\>net use K: \\teacher0\pubread
The command completed successfully.
Then we test looking at the contents of the share, and reading the files.
C:\>dir k:
 Volume in drive K is pubread
 Volume Serial Number is 0C82-11F2

 Directory of K:\

21/01/2009  05:49    <DIR>          .
21/01/2009  05:49    <DIR>          ..
21/01/2009  05:49                17 summer.txt
21/01/2009  05:49                18 winter.txt
               2 File(s)             35 bytes
               2 Dir(s)  13.496.242.176 bytes free
Just to be on the safe side, let us try writing.
K:\>echo very cold > winter.txt
Access is denied.

K:\>
Or you can use windows explorer...
The Windows command line screenshot is made in a Linux console, using netcat as a pipe to a Windows command shell.
The way this works, is by enabling netcat to listen on the windows computer to a certain port, executing cmd.exe when a connection is received. Netcat is similar to cat, in the way that cat does nothing, only netcat does nothing over the network.
To enable this connection, type the following on the windows computer (after downloading netcat for windows).
nc -l -p 23 -t -e cmd.exe
And then connect to this machine with netcat from any Linux computer. You end up with a cmd.exe prompt inside your Linux shell.
paul@laika:~$ nc 192.168.1.38 23
Microsoft Windows [Version 5.2.3790]
(C) Copyright 1985-2003 Microsoft Corp.

C:\>net use k: /delete
net use k: /delete
k: was deleted successfully.
1. Create a directory in a good location (FHS) to share files for everyone to read.
2. Make sure the directory is owned properly and is world accessible.
3. Put a textfile in this directory.
4. Share the directory with Samba.
5. Verify from your own and from another computer (smbclient, net use, ...) that the share is accessible for reading.
6. Make a backup copy of your smb.conf, name it smb.conf.ReadOnlyFileServer.
1. Create a directory in a good location (FHS) to share files for everyone to read.
choose one of these...
mkdir -p /srv/samba/readonly
mkdir -p /home/samba/readonly
/data/sites/web/cobbautbe/subsites/readonly is wrong!!
/etc/samba/readonly is wrong!!
/readonly is wrong!!
2. Make sure the directory is owned properly and is world accessible.
chown root:root /srv/samba/readonly
chmod 755 /srv/samba/readonly
3. Put a textfile in this directory.
echo Hello World > hello.txt
4. Share the directory with Samba.
You smb.conf.readonly could look like this:
[global]
 workgroup = WORKGROUP
 server string = Read Only File Server
 netbios name = STUDENTx
 security = share

[readonlyX]
 path = /srv/samba/readonly
 comment = read only file share
 read only = yes
 guest ok = yes
test with testparm before going in production!
5. Verify from your own and from another computer (smbclient, net use, ...) that the share is accessible for reading.
On Linux: smbclient -NL 127.0.0.1
On Windows Explorer: browse to My Network Places
On Windows cmd.exe: net use L: //studentx/readonly
6. Make a backup copy of your smb.conf, name it smb.conf.ReadOnlyFileServer.
cp smb.conf smb.conf.ReadOnlyFileServer