Table of Contents
- introduction to lvm
- lvm terminology
- example: using lvm
- example: extend a logical volume
- example: resize a physical Volume
- example: mirror a logical volume
- example: snapshot a logical volume
- verifying existing physical volumes
- verifying existing volume groups
- verifying existing logical volumes
- manage physical volumes
- manage volume groups
- manage logical volumes
- practice : lvm
- solution : lvm
Most lvm implementations support physical storage grouping, logical volume resizing and data migration.
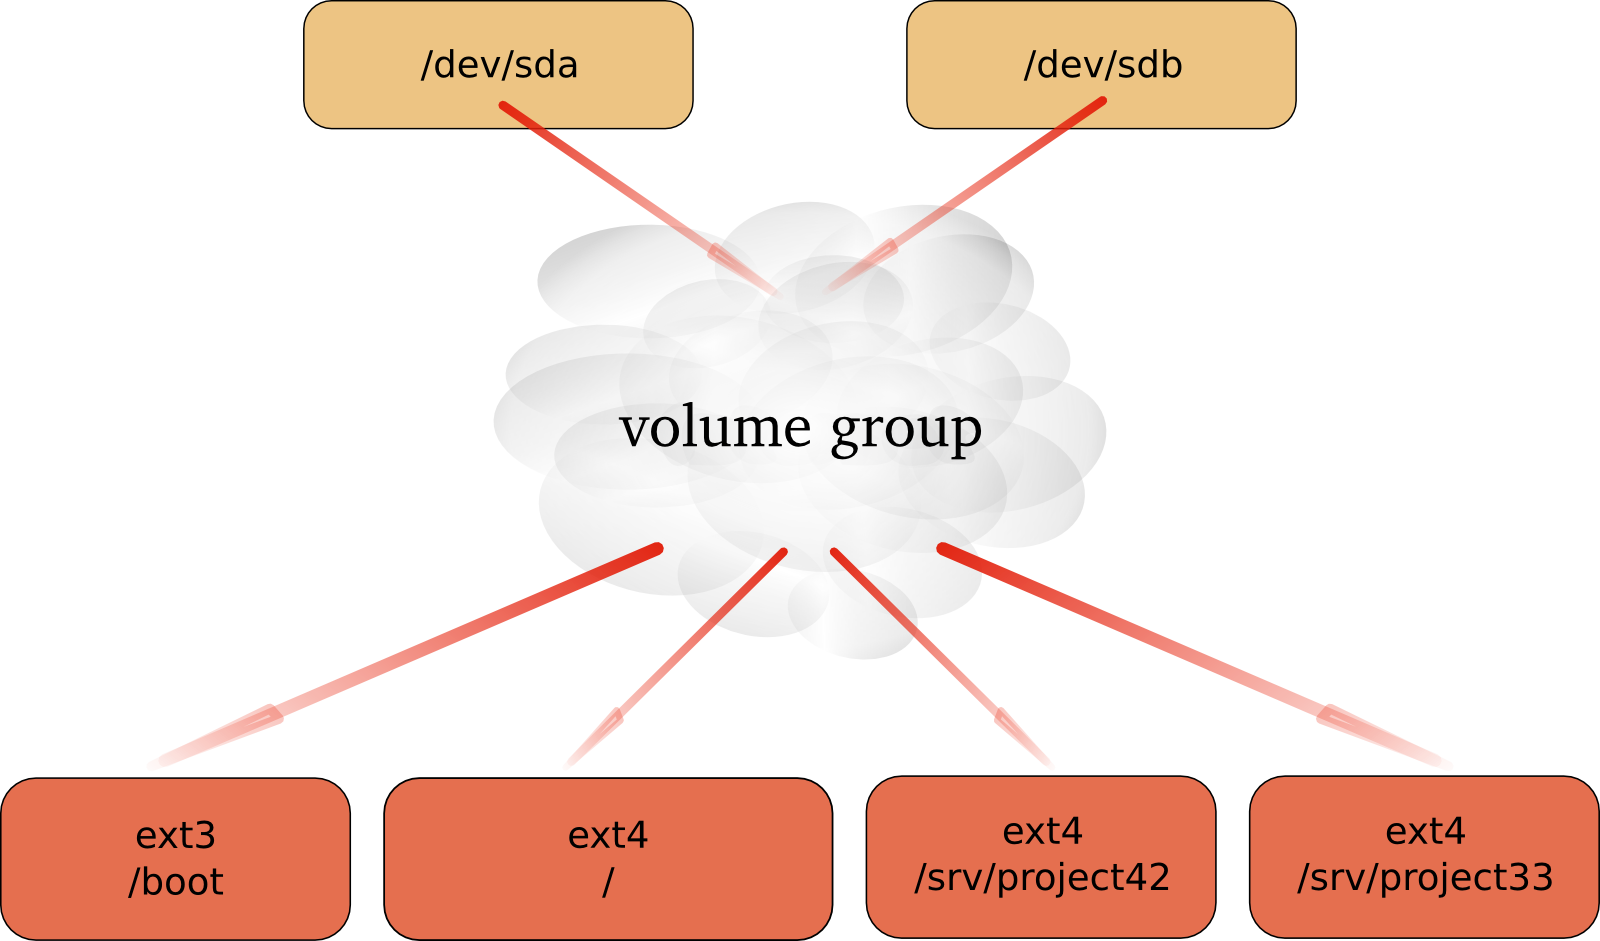
Physical storage grouping is a fancy name for grouping multiple block devices (hard disks, but also iSCSI etc) into a logical mass storage device. To enlarge this physical group, block devices (including partitions) can be added at a later time.
The size of lvm volumes on this physical group is independent of the individual size of the components. The total size of the group is the limit.
One of the nice features of lvm is the logical volume resizing. You can increase the size of an lvm volume, sometimes even without any downtime. Additionally, you can migrate data away from a failing hard disk device, create mirrors and create snapshots.
There are some problems when working with hard disks and standard partitions. Consider a system with a small and a large hard disk device, partitioned like this. The first disk (/dev/sda) is partitioned in two, the second disk (/dev/sdb) has two partitions and some empty space.

In the example above, consider the options when you want to enlarge the space available for /srv/project42. What can you do ? The solution will always force you to unmount the file system, take a backup of the data, remove and recreate partitions, and then restore the data and remount the file system.
A physical volume is any block device (a disk, a partition, a RAID device or even an iSCSI device). All these devices can become a member of a volume group.
The commands used to manage a physical volume start with pv.
[root@centos65 ~]# pv
pvchange   pvck       pvcreate   pvdisplay  pvmove     pvremove
pvresize   pvs        pvscan
A volume group is an abstraction layer between block devices and logical volumes.
The commands used to manage a volume group start with vg.
[root@centos65 ~]# vg
vgcfgbackup    vgconvert      vgextend       vgmknodes      vgs
vgcfgrestore   vgcreate       vgimport       vgreduce       vgscan
vgchange       vgdisplay      vgimportclone  vgremove       vgsplit
vgck           vgexport       vgmerge        vgrename
A logical volume is created in a volume group. Logical volumes that contain a file system can be mounted. The use of logical volumes is similar to the use of partitions and is accomplished with the same standard commands (mkfs, mount, fsck, df, ...).
The commands used to manage a logical volume start with lv.
[root@centos65 ~]# lv
lvchange     lvextend     lvmdiskscan  lvmsar       lvresize
lvconvert    lvm          lvmdump      lvreduce     lvs
lvcreate     lvmchange    lvmetad      lvremove     lvscan
lvdisplay    lvmconf      lvmsadc      lvrename
This example shows how you can use a device (in this case /dev/sdc, but it could have been /dev/sdb or any other disk or partition) with lvm, how to create a volume group (vg) and how to create and use a logical volume (vg/lvol0).
First thing to do, is create physical volumes that can join the volume group with pvcreate. This command makes a disk or partition available for use in Volume Groups. The screenshot shows how to present the SCSI Disk device to LVM.
root@RHEL4:~# pvcreate /dev/sdc
Physical volume "/dev/sdc" successfully created
Note: lvm will work fine when using the complete device, but another operating system on the same computer (or on the same SAN) will not recognize lvm and will mark the block device as being empty! You can avoid this by creating a partition that spans the whole device, then run pvcreate on the partition instead of the disk.
Then vgcreate creates a volume group using one device. Note that more devices could be added to the volume group.
root@RHEL4:~# vgcreate vg /dev/sdc
Volume group "vg" successfully created
The last step lvcreate creates a logical volume.
root@RHEL4:~# lvcreate --size 500m vg
Logical volume "lvol0" created
The logical volume /dev/vg/lvol0 can now be formatted with ext3, and mounted for normal use.
root@RHELv4u2:~# mke2fs -m0 -j /dev/vg/lvol0
mke2fs 1.35 (28-Feb-2004)
Filesystem label=
OS type: Linux
Block size=1024 (log=0)
Fragment size=1024 (log=0)
128016 inodes, 512000 blocks
0 blocks (0.00%) reserved for the super user
First data block=1
Maximum filesystem blocks=67633152
63 block groups
8192 blocks per group, 8192 fragments per group
2032 inodes per group
Superblock backups stored on blocks:
8193, 24577, 40961, 57345, 73729, 204801, 221185, 401409

Writing inode tables: done
Creating journal (8192 blocks): done
Writing superblocks and filesystem accounting information: done

This filesystem will be automatically checked every 37 mounts or
180 days, whichever comes first.  Use tune2fs -c or -i to override.
root@RHELv4u2:~# mkdir /home/project10
root@RHELv4u2:~# mount /dev/vg/lvol0 /home/project10/
root@RHELv4u2:~# df -h | grep proj
/dev/mapper/vg-lvol0  485M   11M  474M   3% /home/project10
A logical volume is very similar to a partition, it can be formatted with a file system, and can be mounted so users can access it.
A logical volume can be extended without unmounting the file system. Whether or not a volume can be extended depends on the file system it uses. Volumes that are mounted as vfat or ext2 cannot be extended, so in the example here we use the ext3 file system.
The fdisk command shows us newly added scsi-disks that will serve our lvm volume. This volume will then be extended. First, take a look at these disks.
[root@RHEL5 ~]# fdisk -l | grep sd[bc]
Disk /dev/sdb doesn't contain a valid partition table
Disk /dev/sdc doesn't contain a valid partition table
Disk /dev/sdb: 1181 MB, 1181115904 bytes
Disk /dev/sdc: 429 MB, 429496320 bytes
You already know how to partition a disk, below the first disk is partitioned (in one big primary partition), the second disk is left untouched.
[root@RHEL5 ~]# fdisk -l | grep sd[bc]
Disk /dev/sdc doesn't contain a valid partition table
Disk /dev/sdb: 1181 MB, 1181115904 bytes
/dev/sdb1               1         143     1148616   83  Linux
Disk /dev/sdc: 429 MB, 429496320 bytes
You also know how to prepare disks for lvm with pvcreate, and how to create a volume group with vgcreate. This example adds both the partitioned disk and the untouched disk to the volume group named vg2.
[root@RHEL5 ~]# pvcreate /dev/sdb1
  Physical volume "/dev/sdb1" successfully created
[root@RHEL5 ~]# pvcreate /dev/sdc
  Physical volume "/dev/sdc" successfully created
[root@RHEL5 ~]# vgcreate vg2 /dev/sdb1 /dev/sdc
  Volume group "vg2" successfully created
You can use pvdisplay to verify that both the disk and the partition belong to the volume group.
[root@RHEL5 ~]# pvdisplay | grep -B1 vg2
  PV Name               /dev/sdb1
  VG Name               vg2
--
  PV Name               /dev/sdc
  VG Name               vg2
And you are familiar both with the lvcreate command to create a small logical volume and the mke2fs command to put ext3 on it.
[root@RHEL5 ~]# lvcreate --size 200m vg2
  Logical volume "lvol0" created
[root@RHEL5 ~]# mke2fs -m20 -j /dev/vg2/lvol0
...
As you see, we end up with a mounted logical volume that according to df is almost 200 megabyte in size.
[root@RHEL5 ~]# mkdir /home/resizetest
[root@RHEL5 ~]# mount /dev/vg2/lvol0 /home/resizetest/
[root@RHEL5 ~]# df -h | grep resizetest
                      194M  5.6M  149M   4% /home/resizetest
Extending the volume is easy with lvextend.
[root@RHEL5 ~]# lvextend -L +100 /dev/vg2/lvol0
  Extending logical volume lvol0 to 300.00 MB
  Logical volume lvol0 successfully resized
But as you can see, there is a small problem: it appears that df is not able to display the extended volume in its full size. This is because the filesystem is only set for the size of the volume before the extension was added.
[root@RHEL5 ~]# df -h | grep resizetest
                      194M  5.6M  149M   4% /home/resizetest
With lvdisplay however we can see that the volume is indeed extended.
[root@RHEL5 ~]# lvdisplay /dev/vg2/lvol0 | grep Size
  LV Size                300.00 MB
To finish the extension, you need resize2fs to span the filesystem over the full size of the logical volume.
[root@RHEL5 ~]# resize2fs /dev/vg2/lvol0
resize2fs 1.39 (29-May-2006)
Filesystem at /dev/vg2/lvol0 is mounted on /home/resizetest; on-line re\
sizing required
Performing an on-line resize of /dev/vg2/lvol0 to 307200 (1k) blocks.
The filesystem on /dev/vg2/lvol0 is now 307200 blocks long.
Congratulations, you just successfully expanded a logical volume.
[root@RHEL5 ~]# df -h | grep resizetest
                      291M  6.1M  225M   3% /home/resizetest
[root@RHEL5 ~]#This is a humble demonstration of how to resize a physical Volume with lvm (after you resize it with fdisk). The demonstration starts with a 100MB partition named /dev/sde1. We used fdisk to create it, and to verify the size.
[root@RHEL5 ~]# fdisk -l 2>/dev/null | grep sde1
/dev/sde1               1         100      102384   83  Linux
[root@RHEL5 ~]#
Now we can use pvcreate to create the Physical Volume, followed by pvs to verify the creation.
[root@RHEL5 ~]# pvcreate /dev/sde1
  Physical volume "/dev/sde1" successfully created
[root@RHEL5 ~]# pvs | grep sde1
  /dev/sde1             lvm2 --    99.98M  99.98M
[root@RHEL5 ~]#
The next step is to use fdisk to enlarge the partition (actually deleting it and then recreating /dev/sde1 with more cylinders).
[root@RHEL5 ~]# fdisk /dev/sde

Command (m for help): p

Disk /dev/sde: 858 MB, 858993152 bytes
64 heads, 32 sectors/track, 819 cylinders
Units = cylinders of 2048 * 512 = 1048576 bytes

   Device Boot      Start         End      Blocks   Id  System
/dev/sde1               1         100      102384   83  Linux

Command (m for help): d
Selected partition 1

Command (m for help): n
Command action
   e   extended
   p   primary partition (1-4)
p
Partition number (1-4):
Value out of range.
Partition number (1-4): 1
First cylinder (1-819, default 1):
Using default value 1
Last cylinder or +size or +sizeM or +sizeK (1-819, default 819): 200

Command (m for help): w
The partition table has been altered!

Calling ioctl() to re-read partition table.
Syncing disks.
[root@RHEL5 ~]#
When we now use fdisk and pvs to verify the size of the partition and the Physical Volume, then there is a size difference. LVM is still using the old size.
[root@RHEL5 ~]# fdisk -l 2>/dev/null | grep sde1
/dev/sde1               1         200      204784   83  Linux
[root@RHEL5 ~]# pvs | grep sde1
  /dev/sde1             lvm2 --    99.98M  99.98M
[root@RHEL5 ~]#
Executing pvresize on the Physical Volume will make lvm aware of the size change of the partition. The correct size can be displayed with pvs.
[root@RHEL5 ~]# pvresize /dev/sde1
  Physical volume "/dev/sde1" changed
  1 physical volume(s) resized / 0 physical volume(s) not resized
[root@RHEL5 ~]# pvs | grep sde1
  /dev/sde1             lvm2 --   199.98M 199.98M
[root@RHEL5 ~]#
We start by creating three physical volumes for lvm. Then we verify the creation and the size with pvs. Three physical disks because lvm uses two disks for the mirror and a third disk for the mirror log!
[root@RHEL5 ~]# pvcreate /dev/sdb /dev/sdc /dev/sdd
  Physical volume "/dev/sdb" successfully created
  Physical volume "/dev/sdc" successfully created
  Physical volume "/dev/sdd" successfully created
[root@RHEL5 ~]# pvs
  PV         VG         Fmt  Attr PSize   PFree
  /dev/sdb              lvm2 --   409.60M 409.60M
  /dev/sdc              lvm2 --   409.60M 409.60M
  /dev/sdd              lvm2 --   409.60M 409.60M
Then we create the Volume Group and verify again with pvs. Notice how the three physical volumes now belong to vg33, and how the size is rounded down (in steps of the extent size, here 4MB).
[root@RHEL5 ~]# vgcreate vg33 /dev/sdb /dev/sdc /dev/sdd
  Volume group "vg33" successfully created
[root@RHEL5 ~]# pvs
  PV         VG         Fmt  Attr PSize   PFree
  /dev/sda2  VolGroup00 lvm2 a-    15.88G      0
  /dev/sdb   vg33       lvm2 a-   408.00M 408.00M
  /dev/sdc   vg33       lvm2 a-   408.00M 408.00M
  /dev/sdd   vg33       lvm2 a-   408.00M 408.00M
[root@RHEL5 ~]#
The last step is to create the Logical Volume with lvcreate. Notice the -m 1 switch to create one mirror. Notice also the change in free space in all three Physical Volumes!
[root@RHEL5 ~]# lvcreate --size 300m -n lvmir -m 1 vg33
  Logical volume "lvmir" created
[root@RHEL5 ~]# pvs
  PV         VG         Fmt  Attr PSize   PFree
  /dev/sda2  VolGroup00 lvm2 a-    15.88G      0
  /dev/sdb   vg33       lvm2 a-   408.00M 108.00M
  /dev/sdc   vg33       lvm2 a-   408.00M 108.00M
  /dev/sdd   vg33       lvm2 a-   408.00M 404.00M
You can see the copy status of the mirror with lvs. It currently shows a 100 percent copy.
[root@RHEL5 ~]# lvs vg33/lvmir
  LV    VG   Attr   LSize   Origin Snap%  Move Log        Copy%
  lvmir vg33 mwi-ao 300.00M                    lvmir_mlog 100.00
A snapshot is a virtual copy of all the data at a point in time on a volume. A snapshot Logical Volume will retain a copy of all changed files of the snapshotted Logical Volume.
The example below creates a snapshot of the bigLV Logical Volume.
[root@RHEL5 ~]# lvcreate -L100M -s -n snapLV vg42/bigLV
  Logical volume "snapLV" created
[root@RHEL5 ~]#
You can see with lvs that the snapshot snapLV is indeed a snapshot of bigLV. Moments after taking the snapshot, there are few changes to bigLV (0.02 percent).
[root@RHEL5 ~]# lvs
  LV       VG         Attr   LSize   Origin Snap%  Move Log Copy%
  bigLV    vg42       owi-a- 200.00M
  snapLV   vg42       swi-a- 100.00M bigLV    0.02
[root@RHEL5 ~]#
But after using bigLV for a while, more changes are done. This means the snapshot volume has to keep more original data (10.22 percent).
[root@RHEL5 ~]# lvs | grep vg42
  bigLV    vg42       owi-ao 200.00M
  snapLV   vg42       swi-a- 100.00M bigLV   10.22
[root@RHEL5 ~]#
You can now use regular backup tools (dump, tar, cpio, ...) to take a backup of the snapshot Logical Volume. This backup will contain all data as it existed on bigLV at the time the snapshot was taken. When the backup is done, you can remove the snapshot.
[root@RHEL5 ~]# lvremove vg42/snapLV
Do you really want to remove active logical volume "snapLV"? [y/n]: y
  Logical volume "snapLV" successfully removed
[root@RHEL5 ~]#
To get a list of block devices that can be used with LVM, use lvmdiskscan. The example below uses grep to limit the result to SCSI devices.
[root@RHEL5 ~]# lvmdiskscan | grep sd
  /dev/sda1                [      101.94 MB]
  /dev/sda2                [       15.90 GB] LVM physical volume
  /dev/sdb                 [      409.60 MB]
  /dev/sdc                 [      409.60 MB]
  /dev/sdd                 [      409.60 MB] LVM physical volume
  /dev/sde1                [       95.98 MB]
  /dev/sde5                [      191.98 MB]
  /dev/sdf                 [      819.20 MB] LVM physical volume
  /dev/sdg1                [      818.98 MB]
[root@RHEL5 ~]#
The easiest way to verify whether devices are known to lvm is with the pvs command. The screenshot below shows that only /dev/sda2 is currently known for use with LVM. It shows that /dev/sda2 is part of Volgroup00 and is almost 16GB in size. It also shows /dev/sdc and /dev/sdd as part of vg33. The device /dev/sdb is knwon to lvm, but not linked to any Volume Group.
[root@RHEL5 ~]# pvs
  PV         VG         Fmt  Attr PSize   PFree
  /dev/sda2  VolGroup00 lvm2 a-    15.88G      0
  /dev/sdb              lvm2 --   409.60M 409.60M
  /dev/sdc   vg33       lvm2 a-   408.00M 408.00M
  /dev/sdd   vg33       lvm2 a-   408.00M 408.00M
[root@RHEL5 ~]#
The pvscan command will scan all disks for existing Physical Volumes. The information is similar to pvs, plus you get a line with total sizes.
[root@RHEL5 ~]# pvscan
  PV /dev/sdc    VG vg33         lvm2 [408.00 MB / 408.00 MB free]
  PV /dev/sdd    VG vg33         lvm2 [408.00 MB / 408.00 MB free]
  PV /dev/sda2   VG VolGroup00   lvm2 [15.88 GB / 0    free]
  PV /dev/sdb                    lvm2 [409.60 MB]
  Total: 4 [17.07 GB] / in use: 3 [16.67 GB] / in no VG: 1 [409.60 MB]
[root@RHEL5 ~]#
Use pvdisplay to get more information about physical volumes. You can also use pvdisplay without an argument to display information about all physical (lvm) volumes.
[root@RHEL5 ~]# pvdisplay /dev/sda2
  --- Physical volume ---
  PV Name               /dev/sda2
  VG Name               VolGroup00
  PV Size               15.90 GB / not usable 20.79 MB
  Allocatable           yes (but full)
  PE Size (KByte)       32768
  Total PE              508
  Free PE               0
  Allocated PE          508
  PV UUID               TobYfp-Ggg0-Rf8r-xtLd-5XgN-RSPc-8vkTHD

[root@RHEL5 ~]#
Similar to pvs is the use of vgs to display a quick overview of all volume groups. There is only one volume group in the screenshot below, it is named VolGroup00 and is almost 16GB in size.
[root@RHEL5 ~]# vgs
  VG         #PV #LV #SN Attr   VSize  VFree
  VolGroup00   1   2   0 wz--n- 15.88G    0
[root@RHEL5 ~]#
The vgscan command will scan all disks for existing Volume Groups. It will also update the /etc/lvm/.cache file. This file contains a list of all current lvm devices.
[root@RHEL5 ~]# vgscan
  Reading all physical volumes.  This may take a while...
  Found volume group "VolGroup00" using metadata type lvm2
[root@RHEL5 ~]#
LVM will run the vgscan automatically at boot-up, so if you add hot swap devices, then you will need to run vgscan to update /etc/lvm/.cache with the new devices.
The vgdisplay command will give you more detailed information about a volume group (or about all volume groups if you omit the argument).
[root@RHEL5 ~]# vgdisplay VolGroup00
  --- Volume group ---
  VG Name               VolGroup00
  System ID
  Format                lvm2
  Metadata Areas        1
  Metadata Sequence No  3
  VG Access             read/write
  VG Status             resizable
  MAX LV                0
  Cur LV                2
  Open LV               2
  Max PV                0
  Cur PV                1
  Act PV                1
  VG Size               15.88 GB
  PE Size               32.00 MB
  Total PE              508
  Alloc PE / Size       508 / 15.88 GB
  Free  PE / Size       0 / 0
  VG UUID               qsXvJb-71qV-9l7U-ishX-FobM-qptE-VXmKIg

[root@RHEL5 ~]#
Use lvs for a quick look at all existing logical volumes. Below you can see two logical volumes named LogVol00 and LogVol01.
[root@RHEL5 ~]# lvs
  LV       VG         Attr   LSize  Origin Snap%  Move Log Copy%
  LogVol00 VolGroup00 -wi-ao 14.88G
  LogVol01 VolGroup00 -wi-ao  1.00G
[root@RHEL5 ~]#
The lvscan command will scan all disks for existing Logical Volumes.
[root@RHEL5 ~]# lvscan
  ACTIVE            '/dev/VolGroup00/LogVol00' [14.88 GB] inherit
  ACTIVE            '/dev/VolGroup00/LogVol01' [1.00 GB] inherit
[root@RHEL5 ~]#
More detailed information about logical volumes is available through the lvdisplay(1) command.
[root@RHEL5 ~]# lvdisplay VolGroup00/LogVol01
  --- Logical volume ---
  LV Name                /dev/VolGroup00/LogVol01
  VG Name                VolGroup00
  LV UUID                RnTGK6-xWsi-t530-ksJx-7cax-co5c-A1KlDp
  LV Write Access        read/write
  LV Status              available
  # open                 1
  LV Size                1.00 GB
  Current LE             32
  Segments               1
  Allocation             inherit
  Read ahead sectors     0
  Block device           253:1

[root@RHEL5 ~]#
Use the pvcreate command to add devices to lvm. This example shows how to add a disk (or hardware RAID device) to lvm.
[root@RHEL5 ~]# pvcreate /dev/sdb
  Physical volume "/dev/sdb" successfully created
[root@RHEL5 ~]#
This example shows how to add a partition to lvm.
[root@RHEL5 ~]# pvcreate /dev/sdc1
  Physical volume "/dev/sdc1" successfully created
[root@RHEL5 ~]#
You can also add multiple disks or partitions as target to pvcreate. This example adds three disks to lvm.
[root@RHEL5 ~]# pvcreate /dev/sde /dev/sdf /dev/sdg
  Physical volume "/dev/sde" successfully created
  Physical volume "/dev/sdf" successfully created
  Physical volume "/dev/sdg" successfully created
[root@RHEL5 ~]#
Use the pvremove command to remove physical volumes from lvm. The devices may not be in use.
[root@RHEL5 ~]# pvremove /dev/sde /dev/sdf /dev/sdg
  Labels on physical volume "/dev/sde" successfully wiped
  Labels on physical volume "/dev/sdf" successfully wiped
  Labels on physical volume "/dev/sdg" successfully wiped
[root@RHEL5 ~]#
When you used fdisk to resize a partition on a disk, then you must use pvresize to make lvm recognize the new size of the physical volume that represents this partition.
[root@RHEL5 ~]# pvresize /dev/sde1
  Physical volume "/dev/sde1" changed
  1 physical volume(s) resized / 0 physical volume(s) not resized
With pvchange you can prevent the allocation of a Physical Volume in a new Volume Group or Logical Volume. This can be useful if you plan to remove a Physical Volume.
[root@RHEL5 ~]# pvchange -xn /dev/sdd
  Physical volume "/dev/sdd" changed
  1 physical volume changed / 0 physical volumes not changed
[root@RHEL5 ~]#
To revert your previous decision, this example shows you how te re-enable the Physical Volume to allow allocation.
[root@RHEL5 ~]# pvchange -xy /dev/sdd
  Physical volume "/dev/sdd" changed
  1 physical volume changed / 0 physical volumes not changed
[root@RHEL5 ~]#
With pvmove you can move Logical Volumes from within a Volume Group to another Physical Volume. This must be done before removing a Physical Volume.
[root@RHEL5 ~]# pvs | grep vg1
  /dev/sdf   vg1        lvm2 a-   816.00M      0
  /dev/sdg   vg1        lvm2 a-   816.00M 816.00M
[root@RHEL5 ~]# pvmove /dev/sdf
  /dev/sdf: Moved: 70.1%
  /dev/sdf: Moved: 100.0%
[root@RHEL5 ~]# pvs | grep vg1
  /dev/sdf   vg1        lvm2 a-   816.00M 816.00M
  /dev/sdg   vg1        lvm2 a-   816.00M      0
Use the vgcreate command to create a volume group. You can immediately name all the physical volumes that span the volume group.
[root@RHEL5 ~]# vgcreate vg42 /dev/sde /dev/sdf
  Volume group "vg42" successfully created
[root@RHEL5 ~]#
Use the vgextend command to extend an existing volume group with a physical volume.
[root@RHEL5 ~]# vgextend vg42 /dev/sdg
  Volume group "vg42" successfully extended
[root@RHEL5 ~]#
Use the vgremove command to remove volume groups from lvm. The volume groups may not be in use.
[root@RHEL5 ~]# vgremove vg42
  Volume group "vg42" successfully removed
[root@RHEL5 ~]#
Use the vgreduce command to remove a Physical Volume from the Volume Group.
The following example adds Physical Volume /dev/sdg to the vg1 Volume Group using vgextend. And then removes it again using vgreduce.
[root@RHEL5 ~]# pvs | grep sdg
  /dev/sdg              lvm2 --   819.20M 819.20M
[root@RHEL5 ~]# vgextend vg1 /dev/sdg
  Volume group "vg1" successfully extended
[root@RHEL5 ~]# pvs | grep sdg
  /dev/sdg   vg1        lvm2 a-   816.00M 816.00M
[root@RHEL5 ~]# vgreduce vg1 /dev/sdg
  Removed "/dev/sdg" from volume group "vg1"
[root@RHEL5 ~]# pvs | grep sdg
  /dev/sdg              lvm2 --   819.20M 819.20M
Use the vgchange command to change parameters of a Volume Group.
This example shows how to prevent Physical Volumes from being added or removed to the Volume Group vg1.
[root@RHEL5 ~]# vgchange -xn vg1
  Volume group "vg1" successfully changed
[root@RHEL5 ~]# vgextend vg1 /dev/sdg
  Volume group vg1 is not resizable.
You can also use vgchange to change most other properties of a Volume Group. This example changes the maximum number of Logical Volumes and maximum number of Physical Volumes that vg1 can serve.
[root@RHEL5 ~]# vgdisplay vg1 | grep -i max
  MAX LV                0
  Max PV                0
[root@RHEL5 ~]# vgchange -l16 vg1
  Volume group "vg1" successfully changed
[root@RHEL5 ~]# vgchange -p8 vg1
  Volume group "vg1" successfully changed
[root@RHEL5 ~]# vgdisplay vg1 | grep -i max
  MAX LV                16
  Max PV                8
Use the lvcreate command to create Logical Volumes in a Volume Group. This example creates an 8GB Logical Volume in Volume Group vg42.
[root@RHEL5 ~]# lvcreate -L5G vg42
  Logical volume "lvol0" created
[root@RHEL5 ~]#
As you can see, lvm automatically names the Logical Volume lvol0. The next example creates a 200MB Logical Volume named MyLV in Volume Group vg42.
[root@RHEL5 ~]# lvcreate -L200M -nMyLV vg42
  Logical volume "MyLV" created
[root@RHEL5 ~]#
The next example does the same thing, but with different syntax.
[root@RHEL5 ~]# lvcreate --size 200M -n MyLV vg42
  Logical volume "MyLV" created
[root@RHEL5 ~]#
This example creates a Logical Volume that occupies 10 percent of the Volume Group.
[root@RHEL5 ~]# lvcreate -l 10%VG -n MyLV2 vg42
  Logical volume "MyLV2" created
[root@RHEL5 ~]#
This example creates a Logical Volume that occupies 30 percent of the remaining free space in the Volume Group.
[root@RHEL5 ~]# lvcreate -l 30%FREE -n MyLV3 vg42
  Logical volume "MyLV3" created
[root@RHEL5 ~]#
Use the lvremove command to remove Logical Volumes from a Volume Group. Removing a Logical Volume requires the name of the Volume Group.
[root@RHEL5 ~]# lvremove vg42/MyLV
Do you really want to remove active logical volume "MyLV"? [y/n]: y
  Logical volume "MyLV" successfully removed
[root@RHEL5 ~]#
Removing multiple Logical Volumes will request confirmation for each individual volume.
[root@RHEL5 ~]# lvremove vg42/MyLV vg42/MyLV2 vg42/MyLV3
Do you really want to remove active logical volume "MyLV"? [y/n]: y
  Logical volume "MyLV" successfully removed
Do you really want to remove active logical volume "MyLV2"? [y/n]: y
  Logical volume "MyLV2" successfully removed
Do you really want to remove active logical volume "MyLV3"? [y/n]: y
  Logical volume "MyLV3" successfully removed
[root@RHEL5 ~]#
Extending the volume is easy with lvextend. This example extends a 200MB Logical Volume with 100 MB.
[root@RHEL5 ~]# lvdisplay /dev/vg2/lvol0 | grep Size
  LV Size                200.00 MB
[root@RHEL5 ~]# lvextend -L +100 /dev/vg2/lvol0
  Extending logical volume lvol0 to 300.00 MB
  Logical volume lvol0 successfully resized
[root@RHEL5 ~]# lvdisplay /dev/vg2/lvol0 | grep Size
  LV Size                300.00 MB
The next example creates a 100MB Logical Volume, and then extends it to 500MB.
[root@RHEL5 ~]# lvcreate --size 100M -n extLV vg42
  Logical volume "extLV" created
[root@RHEL5 ~]# lvextend -L 500M vg42/extLV
  Extending logical volume extLV to 500.00 MB
  Logical volume extLV successfully resized
[root@RHEL5 ~]#
This example doubles the size of a Logical Volume.
[root@RHEL5 ~]# lvextend -l+100%LV vg42/extLV
  Extending logical volume extLV to 1000.00 MB
  Logical volume extLV successfully resized
[root@RHEL5 ~]#
1. Create a volume group that contains a complete disk and a partition on another disk.
2. Create two logical volumes (a small one and a bigger one) in this volumegroup. Format them wih ext3, mount them and copy some files to them.
3. Verify usage with fdisk, mount, pvs, vgs, lvs, pvdisplay, vgdisplay, lvdisplay and df. Does fdisk give you any information about lvm?
4. Enlarge the small logical volume by 50 percent, and verify your work!
5. Take a look at other commands that start with vg* , pv* or lv*.
6. Create a mirror and a striped Logical Volume.
7. Convert a linear logical volume to a mirror.
8. Convert a mirror logical volume to a linear.
9. Create a snapshot of a Logical Volume, take a backup of the snapshot. Then delete some files on the Logical Volume, then restore your backup.
10. Move your volume group to another disk (keep the Logical Volumes mounted).
11. If time permits, split a Volume Group with vgsplit, then merge it again with vgmerge.
1. Create a volume group that contains a complete disk and a partition on another disk.
step 1: select disks:
root@rhel65:~# fdisk -l | grep Disk
Disk /dev/sda: 8589 MB, 8589934592 bytes
Disk identifier: 0x00055ca0
Disk /dev/sdb: 1073 MB, 1073741824 bytes
Disk identifier: 0x00000000
Disk /dev/sdc: 1073 MB, 1073741824 bytes
Disk identifier: 0x00000000
...
I choose /dev/sdb and /dev/sdc for now.
step 2: partition /dev/sdc
root@rhel65:~# fdisk /dev/sdc
Device contains neither a valid DOS partition table, nor Sun, SGI or OSF disk\
label
Building a new DOS disklabel with disk identifier 0x94c0e5d5.
Changes will remain in memory only, until you decide to write them.
After that, of course, the previous content won't be recoverable.

Warning: invalid flag 0x0000 of partition table 4 will be corrected by w(rite)

WARNING: DOS-compatible mode is deprecated. It's strongly recommended to
         switch off the mode (command 'c') and change display units to
         sectors (command 'u').

Command (m for help): n
Command action
   e   extended
   p   primary partition (1-4)
p
Partition number (1-4): 1
First cylinder (1-130, default 1):
Using default value 1
Last cylinder, +cylinders or +size{K,M,G} (1-130, default 130):
Using default value 130

Command (m for help): w
The partition table has been altered!

Calling ioctl() to re-read partition table.
Syncing disks.
step 3: pvcreate and vgcreate
root@rhel65:~# pvcreate /dev/sdb /dev/sdc1
  Physical volume "/dev/sdb" successfully created
  Physical volume "/dev/sdc1" successfully created
root@rhel65:~# vgcreate VG42 /dev/sdb /dev/sdc1
  Volume group "VG42" successfully created
2. Create two logical volumes (a small one and a bigger one) in this volumegroup. Format them wih ext3, mount them and copy some files to them.
root@rhel65:~# lvcreate --size 200m --name LVsmall VG42
  Logical volume "LVsmall" created
root@rhel65:~# lvcreate --size 600m --name LVbig VG42
  Logical volume "LVbig" created
root@rhel65:~# ls -l /dev/mapper/VG42-LVsmall
lrwxrwxrwx. 1 root root 7 Apr 20 20:41 /dev/mapper/VG42-LVsmall -> ../dm-2
root@rhel65:~# ls -l /dev/VG42/LVsmall
lrwxrwxrwx. 1 root root 7 Apr 20 20:41 /dev/VG42/LVsmall -> ../dm-2
root@rhel65:~# ls -l /dev/dm-2
brw-rw----. 1 root disk 253, 2 Apr 20 20:41 /dev/dm-2
root@rhel65:~# mkfs.ext3 /dev/mapper/VG42-LVsmall
mke2fs 1.41.12 (17-May-2010)
Filesystem label=
OS type: Linux
Block size=1024 (log=0)
Fragment size=1024 (log=0)
Stride=0 blocks, Stripe width=0 blocks
51200 inodes, 204800 blocks
10240 blocks (5.00%) reserved for the super user
First data block=1
Maximum filesystem blocks=67371008
25 block groups
8192 blocks per group, 8192 fragments per group
2048 inodes per group
Superblock backups stored on blocks:
	8193, 24577, 40961, 57345, 73729

Writing inode tables: done
Creating journal (4096 blocks): done
Writing superblocks and filesystem accounting information: done

This filesystem will be automatically checked every 39 mounts or
180 days, whichever comes first.  Use tune2fs -c or -i to override.
root@rhel65:~# mkfs.ext3 /dev/VG42/LVbig
mke2fs 1.41.12 (17-May-2010)
Filesystem label=
OS type: Linux
Block size=4096 (log=2)
Fragment size=4096 (log=2)
Stride=0 blocks, Stripe width=0 blocks
38400 inodes, 153600 blocks
7680 blocks (5.00%) reserved for the super user
First data block=0
Maximum filesystem blocks=159383552
5 block groups
32768 blocks per group, 32768 fragments per group
7680 inodes per group
Superblock backups stored on blocks:
32768, 98304
Writing inode tables: done
Creating journal (4096 blocks): done
Writing superblocks and filesystem accounting information: done
This filesystem will be automatically checked every 25 mounts or
180 days, whichever comes first. Use tune2fs -c or -i to override.The mounting and copying of files.
root@rhel65:~# mkdir /srv/LVsmall
root@rhel65:~# mkdir /srv/LVbig
root@rhel65:~# mount /dev/mapper/VG42-LVsmall /srv/LVsmall
root@rhel65:~# mount /dev/VG42/LVbig /srv/LVbig
root@rhel65:~# cp -r /etc /srv/LVsmall/
root@rhel65:~# cp -r /var/log /srv/LVbig/
3. Verify usage with fdisk, mount, pvs, vgs, lvs, pvdisplay, vgdisplay, lvdisplay and df. Does fdisk give you any information about lvm?
Run all those commands (only two are shown below), then answer 'no'.
root@rhel65:~# df -h
Filesystem            Size  Used Avail Use% Mounted on
/dev/mapper/VolGroup-lv_root
                      6.7G  1.4G  5.0G  21% /
tmpfs                 246M     0  246M   0% /dev/shm
/dev/sda1             485M   77M  383M  17% /boot
/dev/mapper/VG42-LVsmall
                      194M   30M  154M  17% /srv/LVsmall
/dev/mapper/VG42-LVbig
                      591M   20M  541M   4% /srv/LVbig
root@rhel65:~# mount | grep VG42
/dev/mapper/VG42-LVsmall on /srv/LVsmall type ext3 (rw)
/dev/mapper/VG42-LVbig on /srv/LVbig type ext3 (rw)
4. Enlarge the small logical volume by 50 percent, and verify your work!
root@rhel65:~# lvextend VG42/LVsmall -l+50%LV
  Extending logical volume LVsmall to 300.00 MiB
  Logical volume LVsmall successfully resized
root@rhel65:~# resize2fs /dev/mapper/VG42-LVsmall
resize2fs 1.41.12 (17-May-2010)
Filesystem at /dev/mapper/VG42-LVsmall is mounted on /srv/LVsmall; on-line res\
izing required
old desc_blocks = 1, new_desc_blocks = 2
Performing an on-line resize of /dev/mapper/VG42-LVsmall to 307200 (1k) blocks.
The filesystem on /dev/mapper/VG42-LVsmall is now 307200 blocks long.

root@rhel65:~# df -h | grep small
/dev/mapper/VG42-LVsmall
                      291M   31M  246M  12% /srv/LVsmall
root@rhel65:~#
5. Take a look at other commands that start with vg* , pv* or lv*.
6. Create a mirror and a striped Logical Volume.
7. Convert a linear logical volume to a mirror.
8. Convert a mirror logical volume to a linear.
9. Create a snapshot of a Logical Volume, take a backup of the snapshot. Then delete some files on the Logical Volume, then restore your backup.
10. Move your volume group to another disk (keep the Logical Volumes mounted).
11. If time permits, split a Volume Group with vgsplit, then merge it again with vgmerge.